

June 2023 Andrea Boswell creates a Monster Mug and Platter
/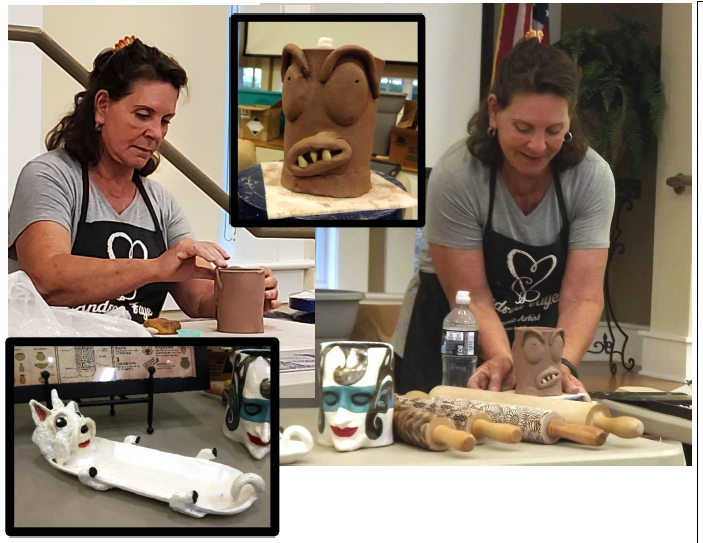
Andrea Boswell Creating a Monster Mug with ceramic teeth!
Our June demo was given by Andrea Faye Boswell in clay pottery. Andrea began the demo by showing us a Monster Mug that she had completed earlier in the day. In making a Monster Mug, Andrea said first you take a slab of clay (which she had already precut to save time) and round out the edges with a bit of water. Then use a tool to cut the edges of the clay at an angle so that the edges fit together when it was time to form a cylinder.
Andrea uses green board (the drywall used in bathrooms) to work the clay on. It sucks the water right out of the clay. Next the eyes are placed at about mid-range on the clay rectangle. Andrea cut out two pieces of clay to lay on top of the rectangle slab to form the eyes. Then she cut out two more pieces of clay of the same size to stack on top of the first two eyes so that the eyes would really pop out.
Andrea scores the back of the pieces so that they will adhere together in the kiln. Since this mug will be lower than the person holding it, the eyebrows will go up and the eyes will go up to ‘see people’. Andrea purchased a set of porcelain teeth like the dentists used to use and uses these for the teeth in the mugs. Since they are porcelain, they can go in the kiln.
After the eyes and eyebrows are in place, Andrea makes the mouth and adds the teeth. To make the mug drinkable, you must round out the edge outward to allow water to pour out (otherwise, it becomes a pencil holder!). Next Andrea makes a cylinder out of the rectangle piece with the face facing out. To add a base, Andrea takes another piece of clay and cuts out a round bottom using a needle tool and a scoring tool to shape and attach the pieces together. She uses a ribbon cutter on one end and a flat wood spatula to shape and pull up the base and smooth it out. Using the tools help to get the marks out of the clay.
To make the handle, Andrea squished some clay together making the clay into a roll over ½ inch thick. She also said that holes have to be put in the handle to allow the air to escape. After she shaped the clay and smoothed the ends, Andrea attached the handle to the mug at the top and bottom, smoothing out any marks.
Andrea doesn’t sign her work but marks it with a potters mark (stamp).
Next Andrea demonstrated how to make a platter. Andrea says you only put texture on the inside of the platter where everyone can see it and stamps and rollers with texture are used to make designs. After the texture is on the clay, Andrea drapes the piece over a form to give it the desired shape. She used a form for the platter. She likes to use a lazy-susan to work on with some kiln stands when using forms. Excess clay is trimmed off of the form by cutting with a tool straight in to make a nice edge.
Next, Andrea flipped over the piece and placed it inside the form to keep the shape and the stamped area is facing upwards. Finally, a sponge is used to soften the edges of the platter and then it’s ready to cure (dry).
There are no limitations when you make a free handed piece and she prefers using forms to a potter’s wheel. She uses a slab roller to control the thickness of the slab. Andrea uses a big hoop cheese cutter to cut slabs from the block of clay. Andrea said that clay has memory so it’s important to ‘slap’ it to knock the memory out so you can get a good shape.
When the clay is totally dry, it is very fragile. You can paint green ware but it can be risky because adding glaze puts water back into the clay and for the first firing, the clay needs to be absolutely dry. She is not a fan of painting green ware and prefers to do two firings. She prefers to use glazes of greens, blues or glitter glaze.
Andrea says she finds a lot of her inspiration on Pinterest.
She buys her clay in 25 pound blocks. Lizella clay is famous, comes from Georgia and is red. Andrea rolls out her own slabs and stores them with plastic between each slab in containers so the clay is ready to be used when she wants it.
There are a lot of tools - like sponges and rolling pins that come from the kitchen! Andrea says to just think outside the box and you will find things that are useful in making patterns in the clay.
She began her exploration with pottery when she took a retreat at the Fayette Parks and Recreation Center and fell in love with clay.
Andrea started the Shasta group which is in its 10th year this fall! You can find Andrea’s work on Instagram at https://www.instagram.com/andreafayeboswell and on her website: http://www.andreafaye.com/